Signed in as:
filler@godaddy.com
.png/:/rs=w:600,cg:true,m)
Coloring books are no longer just for kids; they’ve become a beloved pastime for adults looking to relax, express their creativity, and find a little joy in the mundane. Whether you’re a newbie dipping your toes into the world of coloring or a seasoned pro aiming to refine your skills, this guide has something for everyone. From the best tools to techniques that elevate your coloring game, let’s dive into tips that cater to beginners, intermediates, and advanced colorists alike!
The Allure of Coloring Books - Before we delve into techniques and tools, let’s explore why coloring has captured hearts globally. Coloring provides a therapeutic escape from the hustle and bustle of daily life. It promotes mindfulness, reduces stress, and allows for a creative outlet that can be both fulfilling and fun. With intricate designs and beautiful palettes, it’s no wonder that coloring has become a popular hobby.

Choose the Right Coloring Book – The first step is picking a coloring book that truly resonates with you. For beginners, simpler designs are often best, so you can focus on enjoying the process without feeling overwhelmed. There are many popular coloring book themes to explore, such as ocean life, famous landmarks, inspirational quotes, animals, nature, or mandalas. Exploring different collections gives you the chance to find the one that sparks joy and makes you excited to color. Remember, the key is to enjoy the process and select a book that brings a smile to your face each time you open it! Our 3D Animal Mandala Coloring Book Volume 1 is a great start!
-06e53d0.png/:/rs=w:600,cg:true,m)
When beginning your coloring journey, it’s easy to feel overwhelmed by the vast selection of tools available. However, starting with a few basic, reliable supplies will set you up for success without unnecessary complexity. Below are the essential tools recommended for beginners:·
Colored Pencils: A set of quality colored pencils is a great starting point for any colorist. Brands such as Prismacolor and Crayola are known for their vibrant hues and easy blending capabilities. These pencils make it simple to experiment with color combinations and shading techniques.· Click here to see coloring pencil selection·
Markers: For those who prefer bold, consistent color, water-based markers are ideal. They are less likely to bleed through pages, making them especially beginner-friendly. Consider options like Crayola Super Tips or Faber-Castell for reliable performance and a wide range of colors.· Click here to see marker selection·
Gel Pens: Gel pens can add flair to your coloring projects, providing an easy way to incorporate details and highlights. A small set is sufficient for adding unique touches and enhancing your designs.· Click here to see Gel Pen selection With these basic supplies, you’ll have everything needed to explore a variety of coloring techniques. As your skills and confidence grow, you can gradually expand your toolkit, but starting simple ensures a positive and enjoyable experience.
-b56afb7.png/:/rs=w:600,cg:true,m)
Experiment with Techniques: As a beginner, don’t be afraid to experiment! Trying out different approaches is a great way to learn. Here are a few techniques to get you started, along with simple step-by-step instructions to make each one easy to try:
Basic Shading:
Step 1: Choose a light color and begin shading your area, moving your pencil in one consistent direction (for example, left to right).
Step 2: Select a slightly darker color. Shade over the same area, this time moving your pencil in a direction perpendicular to your first strokes (such as up and down). This layering technique creates depth and a more three-dimensional look.
Blending:
Step 1: Color your section using two or more shades you’d like to blend together.
Step 2: After coloring, gently rub a white colored pencil over the area. Use small, circular motions to blend the colors smoothly and soften any harsh lines.
Doodling: Don’t be afraid to add your personal touch by doodling around your colored areas. Try drawing small shapes, swirls, or patterns along the edges of your work. Doodling not only enhances your designs but also helps you build confidence and creativity as you go.
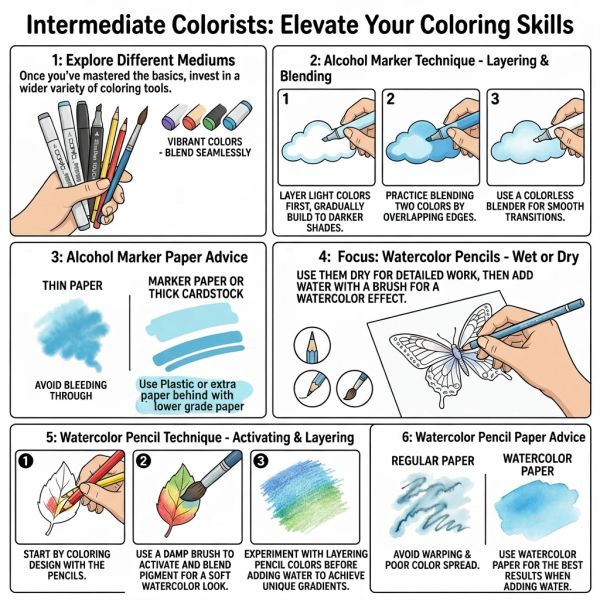
Intermediate Colorists: Once you’ve mastered the basics, it’s time to elevate your coloring skills. Here are some tips for intermediate colorists:
Explore Different Mediums: At this stage, consider investing in a wider variety of coloring tools:
Alcohol Markers: Brands like Copic and ShinHan Touch are popular among intermediate colorists for their vibrant colors and ability to blend seamlessly.
Technique Tips: Try layering light colors first and gradually build up to darker shades. Practice blending two colors by overlapping their edges and using a colorless blender for smooth transitions.
Paper Advice: Use Plastic like a Plastic Folder or a couple of sheets of paper when using them on our lower grade coloring book paper.
Watercolor Pencils: These versatile pencils can be used dry or wet. Use them dry for detailed work, then add water with a brush for a watercolor effect.
Technique Tips: Start by coloring your design with the pencils, then use a damp brush to activate and blend the pigment for a soft watercolor look. Experiment with layering pencil colors before adding water to achieve unique gradients.
Paper Advice: For watercolor pencils, use watercolor paper to achieve the best results when adding water.
%20Firefly%20Upscaler%204x%20scale.png/:/rs=w:600,cg:true,m)
Master Advanced Techniques for Intermediate Colorists: Enhance Your Projects with Purposeful Methods
Now that you’re comfortable with the basics, exploring advanced coloring techniques will help you create artwork that stands out. Each method below not only improves your skill but also transforms your finished pieces in unique ways.
Layering: Building up color gradually by applying multiple layers adds depth and richness to your artwork. When you start with a light base and slowly add darker shades, you’ll notice your colors become more vibrant and realistic. This technique is perfect for creating lifelike shadows and highlights—for example, layering yellows and oranges in a sunset scene makes the sky glow and feel dimensional.
Color Theory: Using complementary colors—those found opposite each other on the color wheel—creates dynamic contrast and makes elements of your artwork pop. For instance, pairing blue and orange in a sunset not only draws attention but also adds visual excitement. Experimenting with these combinations helps your illustrations feel more balanced and lively, encouraging viewers to linger on your work.
Textures: Adding texture by varying your pencil or marker pressure brings your artwork to life. Light pressure creates soft, delicate colors ideal for gentle flower petals, while heavier pressure produces bold, intense hues perfect for sturdy leaves or dramatic backgrounds. Practicing these variations allows you to give each element the right feel and helps you visualize how to use texture for different effects—try switching up your approach for each part of a drawing to see how textures change the overall look.
-a0206bc.png/:/rs=w:600,cg:true,m)
Personalize Your Artwork: Make Your Coloring Projects Stand Out
Adding your own personal touch is what transforms coloring from a hobby into an art form. Let’s explore ways to make your work uniquely yours with creative backgrounds and mixed media techniques.
Backgrounds: Don’t leave your backgrounds blank! Try a sunset gradient—blend yellow, orange, and pink colored pencils smoothly from top to bottom for a glowing effect. Or, make your artwork playful with a polka dot pattern: use a circle stencil or draw freehand dots with different colors across the background.
Step-by-step tips: For gradients, start with the lightest color at the top and gently layer darker shades, blending with a soft circular motion so colors transition smoothly. With patterns, lightly sketch your shapes first, then color them in, keeping your pressure consistent for a crisp look.
Don’t be afraid to experiment—backgrounds are a great place to practice techniques without worrying about messing up your main subject!
Mixed Media: Expand your creativity by combining coloring with other materials. For example, add gold leaf accents to highlight certain areas, making them shimmer and catch the light. Or, create a collage look by gluing magazine cutouts onto your page for extra texture and visual interest.
Practical tips: If you’re adding acrylic paint, start in small sections—like the background or a single element—so you can control the amount and avoid overwhelming your coloring. For collage, choose images that match your color palette and use glue sparingly to prevent wrinkling. Always let each layer dry before moving to the next to keep your artwork neat. Remember, personalizing your artwork is all about experimenting and having fun. Try new combinations, mix materials, and don’t worry about perfection—your unique choices are what make your coloring special. Trust your instincts and let your creativity shine!
.png/:/rs=w:600,cg:true,m)
Taking It to the Next Level: If you’ve already mastered the basics of coloring and want to elevate your skills, here are advanced techniques and tools to explore:
Professional Colored Pencils: Recommended brands include Faber-Castell Polychromes and Derwent Inktense, both known for their rich pigments and exceptional blending capabilities.
Click here to see Coloring Pencils
Click here to view brands we personally use
Try layering colors with professional pencils to achieve rich depth and dimension or use blending markers for smooth gradients and realistic effects. Specialty tools like blending stumps can help soften transitions and add detail, while experimenting with different paper textures—such as rough or smooth finishes—will alter how pigments adhere and impact your final results. These techniques and tools allow advanced colorists to refine their artwork and unlock new creative possibilities.
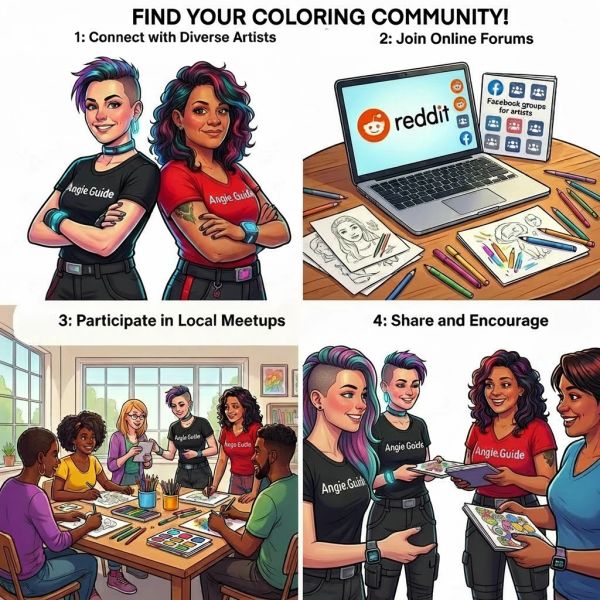
Join a Community – Connecting with other artists can provide inspiration, feedback, and valuable opportunities for growth. Consider joining online forums like Reddit’s r/Coloring, Facebook coloring groups, or local art centers that host coloring meetups. By sharing your work, participating in challenges, and learning from others, you can discover new techniques, gain access to exclusive resources, and build lasting friendships. Community involvement not only motivates you to push your creativity further, but also creates a supportive network to help you improve your skills and enjoy coloring even more.
